SEO for Web Developers: The basics of SEO


While creating this website I needed to learn about the basics of SEO. After reading lots of articles I realized that most of them are mainly focused on the content of a website (texts, images, structure of your content etc.) and usually do not cover the technical aspects of SEO. Oftentimes, we as developers, don't have any control over the final content that is displayed on the websites we create, since that is usually managed experts in that field. Nevertheless, we still have a lot to consider when building websites to ensure that our pages are optimized for search engines. In this article I will cover the basics of SEO and how to optimize your website for search engines - from a technical perspective.
There are many different ways to optimize your website for search engines. In this article, I will cover the more technical aspects of SEO. I will show you the most important HTML Tags and how to use them, as well as how to develop your websites in a way, that web crawlers have a better time understanding them.
Generally, the first thing that a search engine will do after crawling your page is to analyze the HTML tags and content of your page. Therefore, there are a lot of tags you should know, which help you with your SEO. Let's take a look at the most important HTML tags.
Note before we start: This is article by no means a complete list of everything you need to know about SEO, but I will keep this article updated while I learn more about this topic, so that you can use it as a reference while developing your websites.
The <head>-tag: Meta tags
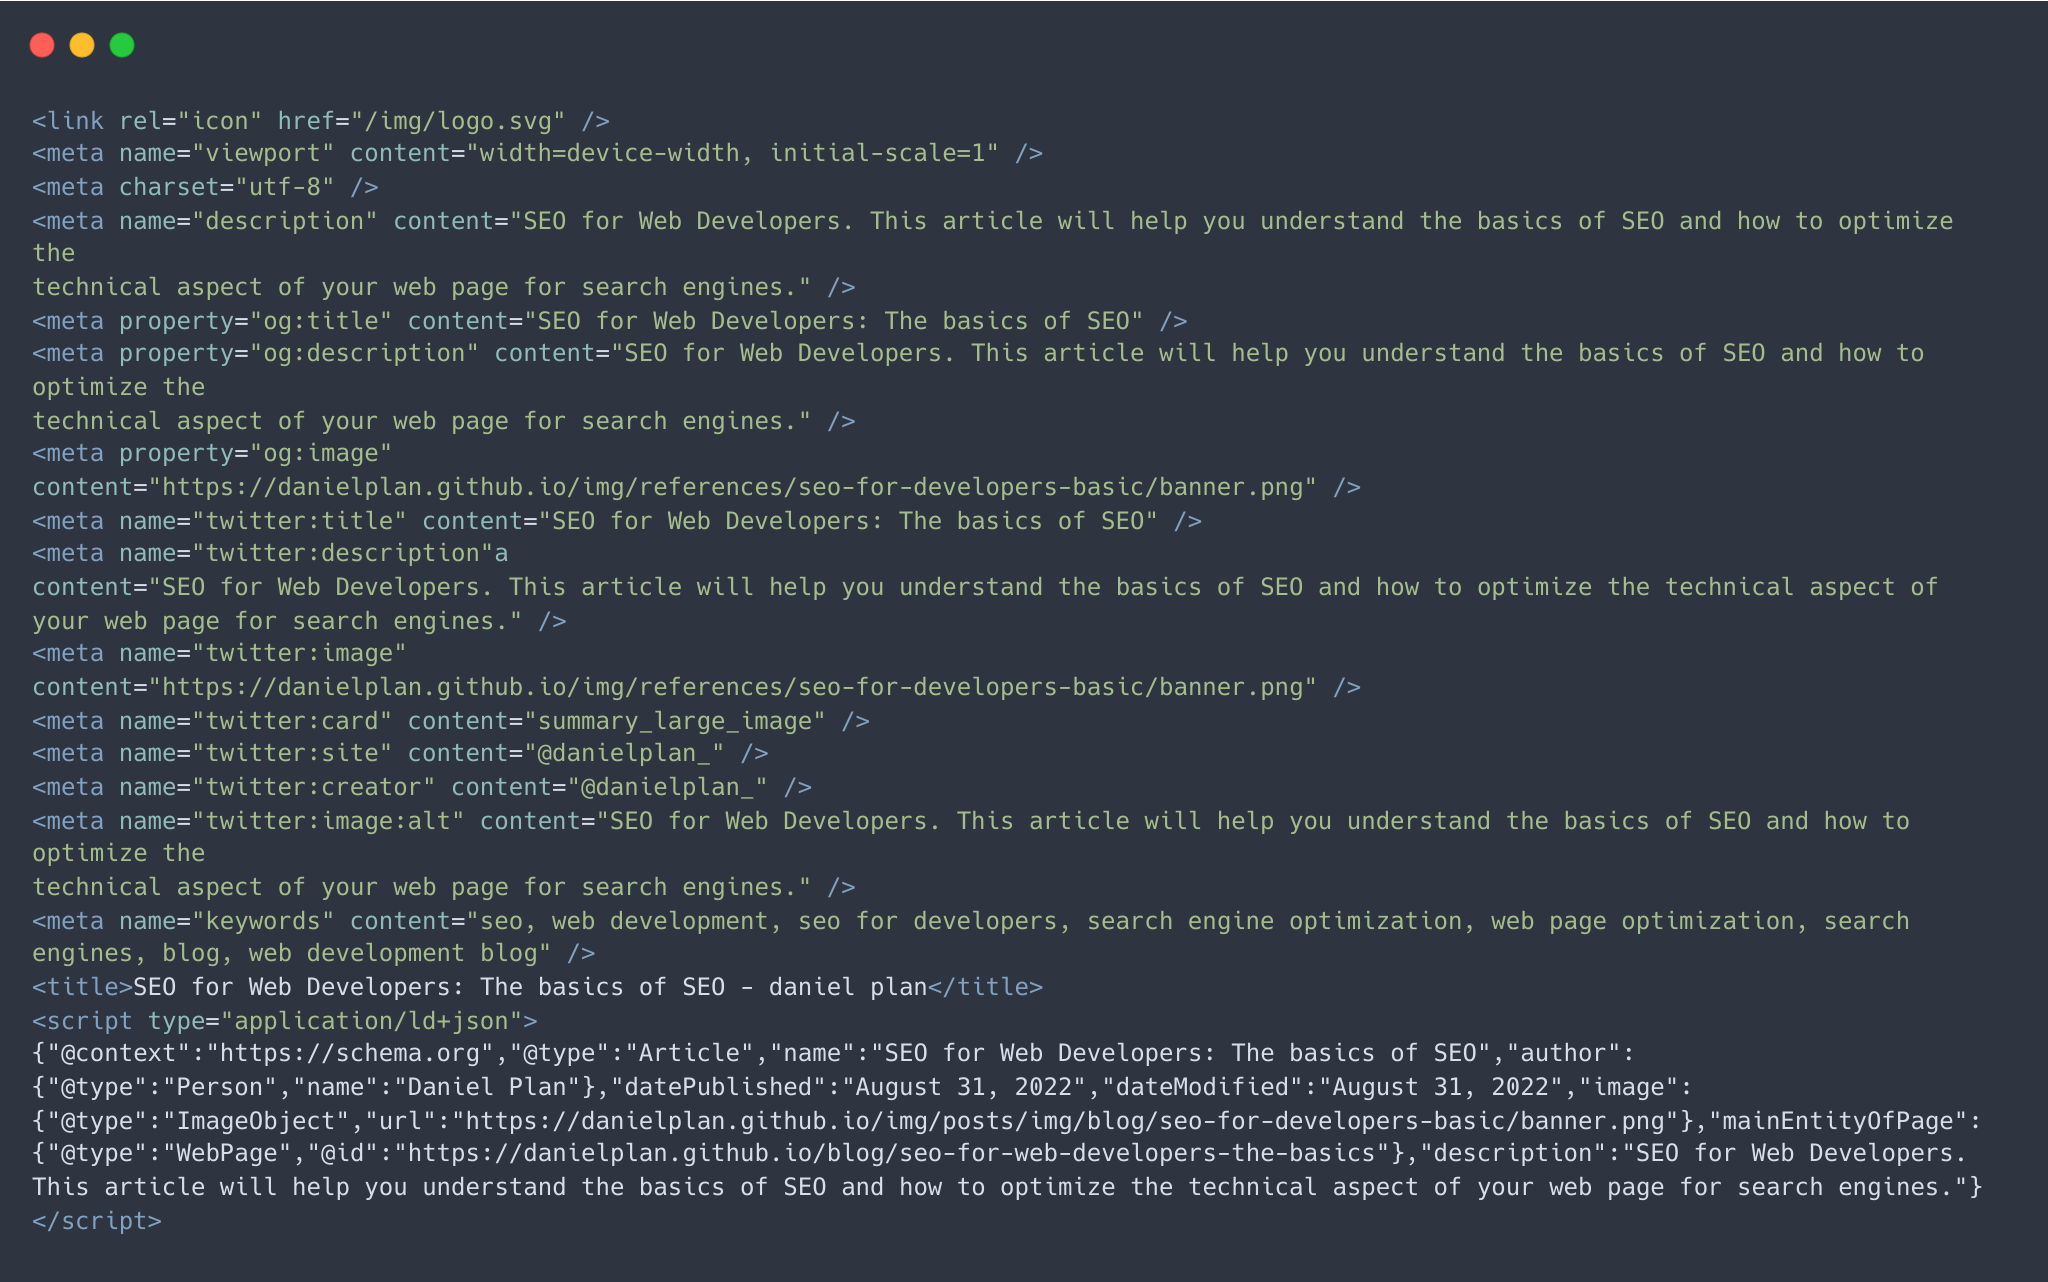
The most widely known way to improve the SEO of a website is to add meta tags to the head of the page. Meta tags contain additional information about the web page and about the content it displays. Such tags contain for example:
- The page title
- A description
- Keywords
- etc.
Let's have a look at some of them in detail and see how they can and how they are used.
Title
The title tag is the most important meta information of your page. It is a short headline that gives a general idea about the content of your website. It is shown as a heading in search results and is also displayed in the browser tab. Using it is very easy and looks something like this:
<html>
    <head>
        <!-- this is the title tag -->
        <title>A fascinating title | daniel plan.</title>
    </head>
    <body>
        <h1>My website</h1>
    </body>
</html>
Description
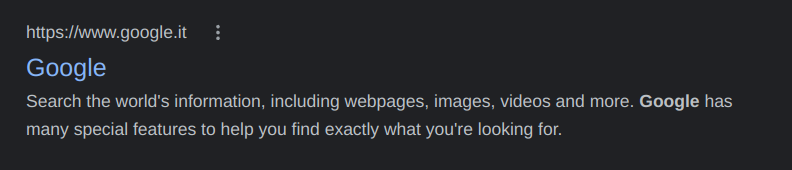
The description is the second most important meta information that the search engine will display directly to the users. It is a short text that is usually displayed beneath the page's title in the search results:
A description can be added to your HTML page by adding the following tag to the head of the page:
<html>
    <head>
        <title>A fascinating title | daniel plan.</title>
        <!-- this is the description tag -->
        <meta name="description" content="A fascinating description. This
        should be a general description of the contents of the page.">
    </head>
    <body>
        <h1>My website</h1>
    </body>
</html>
Favicon
The favicon is a tiny image/icon displayed next to the page's title in the browser tab. It is used to identify the website in the browser, after saving it to your bookmarks or after cluttering the browser's tab bar with other websites. There are many different ways to include a favicon, but the most common way is to use a link to the favicon in the head of the page.
<html>
    <head>
        <title>A fascinating title | daniel plan.</title>
        <meta name="description" content="A fascinating description. This
        should be a general description of the contents of the page.">
        <link rel="icon" href="favicon.ico">
    </head>
    <body>
        <h1>My website</h1>
    </body>
</html>
Modern browser nowadays also support many other formats such as .svg, .png,
.jpg, etc.
Robots
The robots meta tag is used to define how the crawler should interact with your webpage. In this case a crawler is, simply said, a bot that browses through the internet and makes itself a list of all the pages it finds and the information it could find out about it, this process is called indexing. With the robots meta tag, we can define which pages can be indexed and which pages should be ignored, as well as if the links of the page should be followed. For that, we need to specify if the page is indexable (index) or not indexable (noindex) and if the page should be followed (follow) or not (nofollow). This may look something like this:
<html>
    <head>
        <title>A fascinating title | daniel plan.</title>
        <meta name="description" content="A fascinating description. This
        should be a general description of the contents of the page.">
        <link rel="icon" href="favicon.ico">
        <!-- Should be indexed and followed -->
        <meta name="robots" content="index, follow">
        <!-- Should be indexed but not followed -->
        <meta name="robots" content="index, nofollow">
        <!-- Should not be indexed but followed -->
        <meta name="robots" content="noindex, follow">
        <!-- Should not be indexed and not be followed -->
        <meta name="robots" content="noindex, nofollow">
    </head>
    <body>
        <h1>My website</h1>
    </body>
</html>
The values specified above (index/noindex, follow/nofollow) need to be given in this structure, so that the crawler can read it (comma separated and in the content attribute).
Even though it may seem a bit useless at first, this tag is actually very important. With it, you can tell the crawler that some page may not be indexed. This is handy, if you have pages that are not supposed to be indexed, such as hidden pages. This needs to be considered, when creating a website, since sometimes we create pages that are not intended to be indexed.
Keywords
The Keywords meta tag simply allows us to specify keywords that are relevant to the page. This may look something like this:
<html>
    <head>
        <title>A fascinating title | daniel plan.</title>
        <meta name="description" content="A fascinating description. This
        should be a general description of the contents of the page.">
        <link rel="icon" href="favicon.ico">
        <meta name="keywords" content="keyword1, keyword2, keyword3">
    </head>
    <body>
        <h1>My website</h1>
    </body>
</html>
The keywords are simply separated by commas. Later in this article we will see another way to highlight keywords
in the paragraphs of your page, using the strong tag.
Canonical URL
The canonical meta tag is used to describe that the page is a duplicate of another page. This is needed if you have multiple pages with the same content but on different paths of your website. For instance, you might run into a situation similar to this one:
You have a page that displays a product on the path /products/cool-shirt/. However
you also want to make it available with the path /products/summer-line/cool-shirt/.
For such cases you need to use the canonical meta tag to tell the crawler that the page is a duplicate of the
page with the path /summer-line/cool-shirt/.
Here is an exampleof the canonical meta tag:
<html>
    <head>
        <title>A fascinating title | daniel plan.</title>
        <meta name="description" content="A fascinating description. This
        should be a general description of the contents of the page.">
        <meta name="keywords" content="keyword1, keyword2, keyword3">
        <meta name="robots" content="index, follow">
        <meta name="canonical" content="https://www.danielplan.com/summer-line/cool-shirt/">
    </head>
    <body>
        <h1>My website</h1>
    </body>
</html>
Open Graph
The last type of meta tags I want to get into are the Open Graph tags. These are very similar to the meta tags described above, yet they are not used by search engines or the browser, but were created to be used by social media platforms.
Open Graph tags describe the page to social media sites, so that they are able to render a widget when the user shares the web-page in a post. These widgets usually contain a title, a short description and an image.
Here is an example of how Open Graph tags can be implemented on your page:
<html>
    <head>
        <title>A fascinating title | daniel plan.</title>
        <meta name="description" content="A fascinating description. This
        should be a general description of the contents of the page.">
        <meta name="keywords" content="keyword1, keyword2, keyword3">
        <meta name="robots" content="index, follow">
        <meta name="canonical" content="https://www.danielplan.com/summer-line/cool-shirt/">
        <!-- Open graph (OG) tags-->
        <meta property="og:title" content="A fascinating title | daniel plan.">
        <meta property="og:description" content="A fascinating description. This
        should be a general description of the contents of the page.">
        <meta property="og:image" content="https://www.danielplan.com/img/blog/seo-for-developers-basic/og_image.png">
        <meta property="og:url" content="https://www.danielplan.com/summer-line/cool-shirt/">
        <meta property="og:type" content="website">
    </head>
    <body>
        <h1>My website</h1>
    </body>
</html>
In the code snippet above, we can see how the Open Graph meta tags are used. The property attribute has to
start
with og: followed by the name of the attribute. The content attribute contains the value
of the
attribute.
Let's look at the different attributes that the Open Graph Protocol allows:
-
og:title- The title of the page.
-
og:description- The description of the page.
-
og:image- A preview image of the page - this is displayed as a banner in the widget.
-
og:url- The URL of the page.
-
og:type- The type of the page. Possible values here are for examplewebsite,articleand more. See all possible values here.
If you are further interested in the Open Graph meta tags, you can find more information on the Open Graph Protocol.
Semantic HTML-Tags
After we have seen how the <head>-tag can be structured using meta tags, we still have to improve the
structure and the content of our <body>-tag.
With HTML5, a lot of semantic tags have been introduced. These are tags that do
not change the styling of your page, but give certain elements of your web-page a meaning and
context
just by looking at the HTML-Structure. This means,
that instead of
using
<div> or <span>, we can use such tags to say that a certain <div>, for
instance, is actually the page's navigation. Using this information, web crawlers are able to understand the
structure of our page, without
actually seeing it.
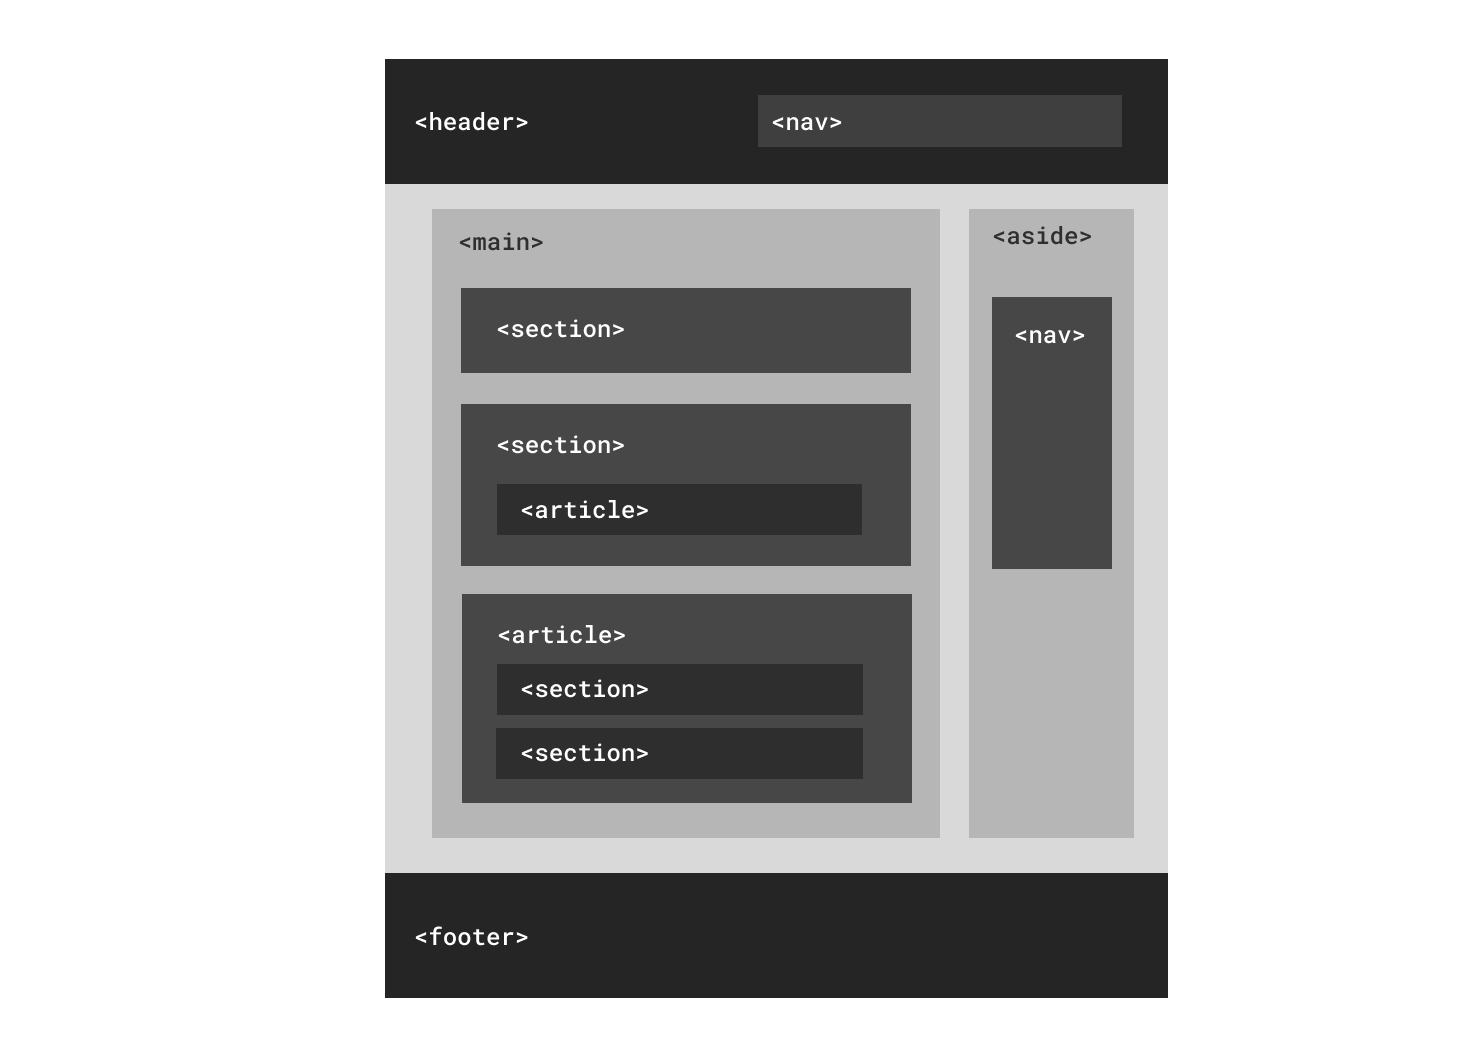
Semantic HTML tags are simple to use and easy to understand. Nevertheless, they are oftentimes forgotten while building websites. So let's briefly explain which ones exist and how they work. Let's first look at a quick sketch of how a page may be structured, using semantic HTML-Tags
<header>-tag
The header tag is used to define the/a header-section of a page. This section usually contains the
company's logo,
a navigation and other links and is displayed at the top of the page. However, a header can also be the
headline
of an article or a page. It can be used multiple times throughout the page, but can (for obvious reasons) only be
used outside of a
<footer>- and <address>-tag.
<footer>-tag
The footer tag is used to describe the footer-section of a the whole website or a section within a page. This usually contains the copyright notice, contact information, author information a navigation and other links and is displayed at the bottom of the page. You can use this tag multiple times throughout the page.
<address>-tag
The address tag is used to describe the contact information of a company or a person. This usually contains the address, phone number, email address and other contact information.
<article>-tag and <section>-tag
These two tags are very similar but still have a small difference in their semantic meaning.
First, both of them describe a section of page. However, the most important difference is that
<article>-tag needs to be self-contained and should therefore be used for parts of a
page, that
are in a way self-sufficient. This means that a great example for the <article>-tag are for example
comments since
once a comment is over, there is not coming any new content that has to do with this specific comment. Obviously,
just by looking at the name of the tag
any form of article can also be within the <article>-tag.
The <section>-tag is used to describe a section of a page, meaning that it is not self-contained and
relies to other section to form a complete page. This tag is therefore used if you, for instance,
have multiple
parts
on your page, such as a an about-section or a contact-form. Since they both form the whole page they can be seen as
sections
of the page.
The section is therefore more general purpose.
So simply-said:
-
the
article-tag describes content that is self-contained. -
the
section-tag describes content that is only a part of the whole page.
<nav>-tag
The nav-tag is used to describe the navigation of a page. This usually contains links to other
web pages or
anchors within the current page.
There can be multiple nav tags on a page.
However not all the links should be within navigation tags. It is only intended to be used for multiple links grouped together, which form a navigation.
<aside>-tag
The aside-tag symbolizes a side-section of a page. This usually is a sidebar or a some form of widget
which
is displayed
next to the main
content of a website.
<figure>-tag and <figcaption>-tag
The figure-tag is used to describe some form of image or a chart, usually with a caption.
It usually contains an img-tag to display the image and a figcaption-tag to
describe the
caption of the graphic. The caption needs to be either the first or the last child of the figure
tag.
Let's look at
an example
<figure>
    <img src="https://www.danielplan.com/img/blog/seo-for-developers-basic/figure_image.png" alt="A caption">
    <figcaption>A caption</figcaption>
</figure>
<time>-tag
This tag is used to define, that certain content is related to a date or a certain time. With it, certain strings of text can become readable for the web browsers and machines other . This is useful, for instance, if you want to display a date or a time in a way, that some agent would be able to add it to the user's calendar.
Since this tag includes an attribute, let's have a look at how it may be used.
<time datetime="2016-01-01">January 1st, 2016</time><time datetime="20:00">20:00</time>
The datetime-attribute is used to give the date and time of the content in machine-readable
way.
If you are interested in this tag, please consult the
Mozilla Developer Network for more information on how this attribute can be formed.
<main>-tag
The main-tag is used to define which part of the page contains the main content of the
page. This tag can only be used once in a page and must be outside of <header>-,
<footer>-,
<aside>-, <article>-
and <nav>-tags.
Other important tags
Nevertheless, not only the new HTML5 tags have semantic meaning, but also the old HTML tags have some meta information that needs to be considered when building a website. In addition to that, there are tags that are important to use correctly to ensure good SEO.
Heading tags
The order of and structure heading tags is crucial when developing a site.
For example, the <h1>-tag is used to describe the main headline of a page. This tag
can and should only be used once on a page. The rest of the heading tags are used to describe the
sub-headlines of
a page in a hierarchical order. For instance:
<h1>The basics of SEO</h1>
<h2>Head-Tags</h2>
<h3>Title-Tag</h3>
<h2>Semantic HTML</h2>
<h3>HTML5-Tags</h3>
<h4>Main-Tag</h4><img>-tag
The <img>-tag needs to have an alt-attribute to describe the image. This is crucial for
SEO
and
is mainly used for machines to understand the content of the image, which would otherwise be
inaccessible for them.
It should contain a few words that describe the image. For instance:
<img
    src="https://www.danielplan.com/img/blog/seo-for-developers-basic/figure_image.png"
    alt="A caption"
/>
Also the height- and width-attributes are important to use, since they are
used to
define the size of the image on the page, so that the website-renderer knows, how large the image will
be, without
loading the image itself or the CSS.
Otherwise, the image might force to page to resize after it has been loaded, which would be a
bad
experience for the user and therefore is punished by search engines.
<img
    src="https://www.danielplan.com/img/blog/seo-for-developers-basic/figure_image.png"
    alt="A caption"
    height="300"
    width="300"
/>
<strong> and <em>
<strong> and <em> are very similar to the <b> and
<i>
in their styling, but add a semantic meaning to it.
<strong> is used to describe that some
words in the text are important and may be be used by crawlers as keywords for your page.
<em> is used to lay emphasize on a portion of text, that needs to be read
in a different tone. With it,
the agent/web crawler can
give the text portion more relevance.
Structured data: Schema.org
Another interesting topic of SEO is structured data. Similar to meta data, structured data is used to give the search engines additional information about content of a page in a machine-readable way, so that they can render beautiful and understandable widgets to the user of the search engine, with so-called "rich results". This data is not only used by search engines, but also other agents, who crawl the web.
In this section, I will only give a brief overview of some types and how it is used. For more information, please consult the Schema.org-website.
An example of structured data
First, let's have a look at a simple example of structured data, so that you know what I'm talking about.
Let's say you create a blog article and you
want that search engines understand that this web page is a blog post. For that, you need to add the following
meta-data to the <head> of your HTML-Document:
<script type="application/ld+json">{
    "@context": "http://schema.org",
    "@type": "Article",
    "headline": "The basics of SEO",
    "datePublished": "2016-01-01",
    "dateModified": "2016-01-01",
    "author": {
        "@type": "Person",
        "name": "Daniel Plan"
    },
    "publisher": {
        "@type": "Organization",
        "name": "Daniel Plan",
        "logo": {
            "@type": "ImageObject",
            "url": "https://www.danielplan.com/img/blog/seo-for-developers-basic/logo.png"
        }
    },
    "description": "This is a blog post about the basics of SEO for developers.",
    "mainEntityOfPage": {
        "@type": "WebPage",
        "@id": "https://www.danielplan.com/blog/seo-for-developers-basic"
    },
    "image": {
        "@type": "ImageObject",
        "url": "https://www.danielplan.com/img/blog/seo-for-developers-basic/figure_image.png",
        "height": "300",
        "width": "300"
    }
}</script>
As you can see in the snippet above, structured data is added using a JSON-LD-format. The
@context-attribute defines that we are in fact adding structured data using the schema.org
structure.
The @type-attribute is used to define the type of object you want to describe.
The other attributes are depend on the type of structured data you implement and its values come
from the the content you want to describe. Using these
attributes, the search engine can understand your page and can render the correct widgets to the user.
Types of Schemas
Now that you have a simple understanding on how to use structured data, let's have a look at some more types of structured data. There are many different types that are available for structured data, the most common ones are for:
- Organization: used to describe information about an organization such as companies, schools etc.
- Person: This type is used to describe a person.
- Product: This describes a product or a service, it contains information such as price, rating etc.
- Event: This type is used to describe an event, it contains information such as date, location etc. Events may be lectures, concerts, festivals, workshops etc.
- Recipe: Used to describe a recipe, it contains information such as ingredients, cooking instructions etc. Recipes are rendered as widgets on the search engine's result page. Using the data of the schema, recipes can even be found using only ingredients and calories.
- Place: This type is used to describe a place, it contains information such as address, opening hours etc. Locations can be restaurants, hotels, museums etc.
If you are interested in more types of structured data, Google offers a great resource where they list the different and how they are rendered on the search engine's result